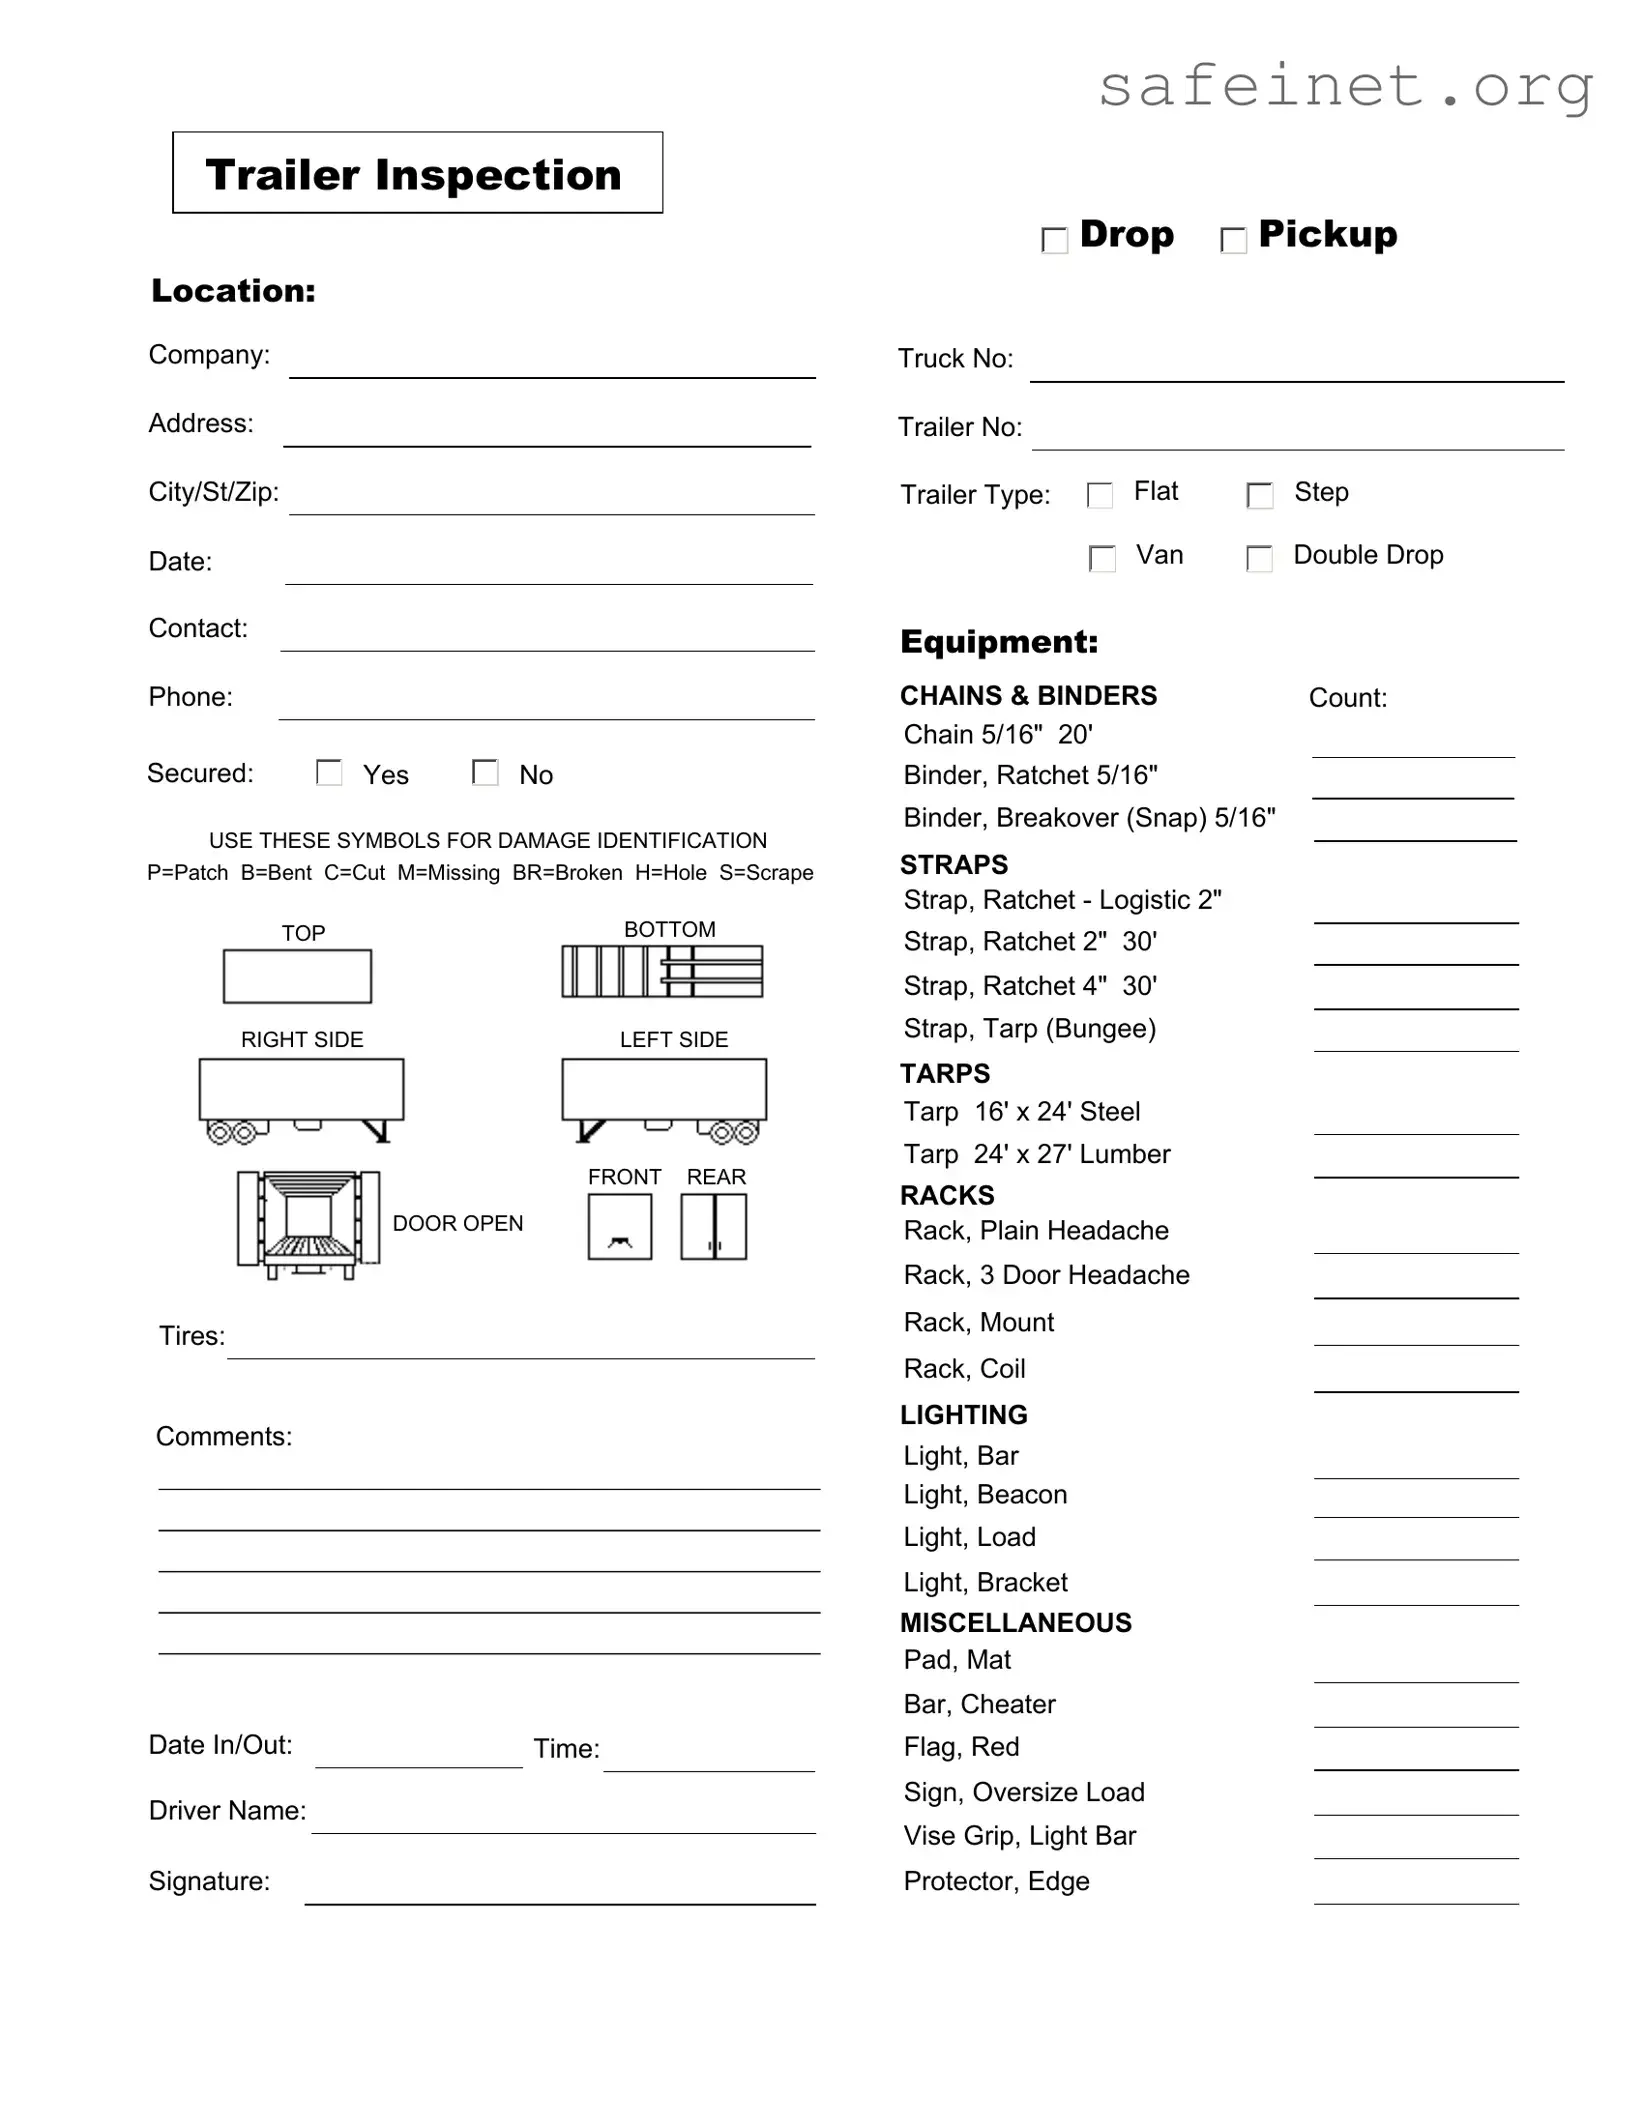
When it comes to ensuring the safety and reliability of trailers on the road, the Trailer Inspection form serves as a critical tool for both companies and drivers. This comprehensive document captures essential details such as the inspection location, date, and contact information, along with specific identifiers for the truck and trailer numbers. It provides a structured approach to assess various trailer types and their equipment, including flatbeds, vans, and specialized trailers. Each inspection includes a thorough evaluation of the trailer's condition, utilizing a standardized damage identification system that employs symbols to denote issues like patches, bends, cuts, and missing components. Notably, the form also addresses tire conditions and allows for additional comments, ensuring that no detail is overlooked. Furthermore, it encompasses a checklist for chains, binders, straps, tarps, racks, and lighting equipment, making it a holistic resource for maintaining compliance and safety standards. By requiring the driver's name and signature, the form fosters accountability and reinforces the importance of diligent inspections in the transportation industry.
Trailer Inspection
Location:
Drop |
Pickup |
Company:
Address:
City/St/Zip:
Date:
Contact:
Truck No:
Trailer No:
Trailer Type:
Equipment:
Flat
Van
Step
Double Drop
Phone:
Secured: |
Yes |
No |
USE THESE SYMBOLS FOR DAMAGE IDENTIFICATION P=Patch B=Bent C=Cut M=Missing BR=Broken H=Hole S=Scrape
TOPBOTTOM
RIGHT SIDE |
LEFT SIDE |
FRONT REAR
DOOR OPEN
Tires:
Comments:
Date In/Out: |
|
Time: |
|
|
|
Driver Name:
Signature:
CHAINS & BINDERS |
Count: |
|
||
Chain 5/16" 20' |
|
|
|
|
Binder, Ratchet 5/16" |
|
|
|
|
|
|
|
||
Binder, Breakover (Snap) 5/16" |
|
|
|
|
|
|
|
||
STRAPS |
|
|
|
|
|
|
|
|
|
Strap, Ratchet - Logistic 2" |
|
|
|
|
Strap, Ratchet 2" |
30' |
|
|
|
|
|
|
||
Strap, Ratchet 4" |
30' |
|
|
|
|
|
|
||
Strap, Tarp (Bungee)
TARPS
Tarp 16' x 24' Steel
Tarp 24' x 27' Lumber
RACKS
Rack, Plain Headache
Rack, 3 Door Headache
Rack, Mount
Rack, Coil
LIGHTING
Light, Bar
Light, Beacon
Light, Load
Light, Bracket
MISCELLANEOUS
Pad, Mat
Bar, Cheater
Flag, Red
Sign, Oversize Load
Vise Grip, Light Bar
Protector, Edge
| Fact Name | Description |
|---|---|
| Purpose | The Trailer Inspection form is designed to ensure that trailers are safe and compliant with state regulations before use. |
| Inspection Location | It requires the location where the inspection takes place, helping to track where the trailer was assessed. |
| Contact Information | Contact details such as the name and phone number of the inspector are crucial for follow-up communication. |
| Damage Identification | Symbols like P for Patch and B for Bent are used to identify specific types of damage on the trailer. |
| State-Specific Regulations | Each state may have its own governing laws regarding trailer inspections, such as California Vehicle Code § 24001. |
| Tire Assessment | The form includes a section to evaluate tire conditions, which is essential for safe towing. |
| Driver Verification | A signature from the driver confirms that they acknowledge the inspection results and any issues noted. |
| Equipment Checklist | The form features a comprehensive checklist for various equipment types, ensuring nothing is overlooked during the inspection. |
Completing the Trailer Inspection form is an important step in ensuring safety and compliance. After filling out this form, you will have a clear record of the trailer's condition and any necessary actions that may need to be taken. Follow these steps carefully to ensure all information is accurately captured.
What is the purpose of the Trailer Inspection form?
The Trailer Inspection form is designed to ensure that all trailers are thoroughly checked for safety and compliance before they are used. This form helps identify any potential issues, such as damage or missing equipment, that could pose risks during transportation. By completing this form, drivers and companies can maintain high safety standards and protect their assets.
What information is required on the form?
Essential details include the inspection location, the name of the pickup company, the address, and the date of inspection. Additionally, you will need to provide contact information, truck and trailer numbers, and the type of trailer being inspected. The form also requires a section for comments and the names of the driver and the person conducting the inspection.
How should damage be reported on the form?
When reporting damage, use the provided symbols to indicate the type and location of the damage. For example, a "B" indicates a bent area, while an "H" signifies a hole. Mark the corresponding area on the diagram of the trailer to clearly communicate the issue. This visual representation helps ensure that everyone understands the extent and location of the damage.
What types of equipment are listed on the form?
The form includes various types of equipment, such as chains, binders, straps, tarps, racks, and lighting. Each category specifies different sizes and types, allowing for a comprehensive check of all necessary items. Ensuring that this equipment is present and in good condition is crucial for safe trailer operation.
What does the 'Secured' section refer to?
This section asks whether the trailer and its contents are secured. You will indicate 'Yes' or 'No' based on your assessment. Proper securing of the load is vital to prevent accidents during transit. If the load is not secured, it poses a significant risk to both the driver and other road users.
How often should the Trailer Inspection form be completed?
The Trailer Inspection form should be completed each time a trailer is used. Regular inspections help catch any issues early and ensure that all safety measures are in place. This practice not only promotes safety but also helps maintain the trailer's longevity and performance.
What should I do if I find damage during the inspection?
If you discover any damage during the inspection, document it clearly on the form using the appropriate symbols. Depending on the severity of the damage, you may need to report it to your supervisor or maintenance team immediately. Addressing these issues promptly can prevent further complications and ensure safety on the road.
Who is responsible for completing the Trailer Inspection form?
The responsibility for completing the Trailer Inspection form typically falls on the driver or the individual conducting the inspection. However, it is important for both the driver and the company to ensure that the inspection is thorough and accurate. Collaboration between all parties helps foster a culture of safety and accountability.
Incomplete Information: Failing to fill out all required fields can lead to delays. Ensure every section, such as Trailer No and Truck No, is complete.
Incorrect Damage Symbols: Using the wrong symbols for damage identification can cause confusion. Familiarize yourself with the symbols provided, such as P for Patch and B for Bent.
Missing Contact Information: Not providing a phone number or contact person can hinder communication. Always include a reliable contact.
Neglecting to Specify Equipment: Omitting details about the type of equipment can lead to misunderstandings. Clearly indicate whether the trailer is a Flat, Van, or another type.
Ignoring Tire Condition: Failing to comment on tire condition can overlook safety issues. Always assess and note the state of the tires.
Signature Omission: Not signing the form can invalidate the inspection. Ensure that the Driver Name and Signature are included.
Incorrect Date and Time: Providing the wrong date or time can lead to complications. Double-check these entries before submission.
The Trailer Inspection form is an essential document used to assess the condition and safety of trailers before and after use. However, it is often accompanied by several other forms and documents that provide additional information or fulfill regulatory requirements. Below is a list of commonly used documents in conjunction with the Trailer Inspection form.
These documents work in tandem with the Trailer Inspection form to ensure that all aspects of trailer operation and safety are addressed. Together, they contribute to a comprehensive approach to transportation safety and compliance.
The Vehicle Inspection Report serves a similar purpose to the Trailer Inspection form, as it documents the condition of a vehicle before it is used for transportation. This report typically includes sections for the vehicle's identification, inspection date, and a checklist of various components such as tires, lights, and brakes. Both documents emphasize the importance of identifying any damage or deficiencies, ensuring safety and compliance with regulations. The Vehicle Inspection Report may also require signatures from the inspector and the driver, similar to the signature requirement in the Trailer Inspection form.
The Equipment Condition Report is another document that parallels the Trailer Inspection form. This report focuses on the overall condition of equipment used in transportation, including trailers. It includes sections for equipment type, identification numbers, and a checklist for functionality and safety. Like the Trailer Inspection form, it utilizes symbols or codes to indicate various types of damage or issues. Both documents aim to provide a comprehensive overview of the equipment's condition, facilitating informed decisions about repairs or replacements.
The Shipping and Receiving Log is similar in that it tracks the status and condition of goods during transit. While it does not focus specifically on trailers, it includes vital information such as the date, time, and condition of shipments. Both documents require attention to detail and accuracy, ensuring that any discrepancies or damages are documented promptly. The Shipping and Receiving Log helps maintain accountability throughout the shipping process, much like the Trailer Inspection form does for the trailer itself.
The Maintenance Record is another document that shares similarities with the Trailer Inspection form. This record details the history of maintenance and repairs performed on a trailer or vehicle. It includes dates, descriptions of work done, and any parts replaced. Both documents emphasize the importance of keeping accurate records to ensure the safety and reliability of transportation equipment. The Maintenance Record can provide context for any issues noted in the Trailer Inspection form, helping to assess whether recurring problems exist.
The Load Securement Checklist also bears resemblance to the Trailer Inspection form, as it focuses on the safe transport of cargo. This checklist outlines the necessary steps and equipment used to secure loads properly. It may include sections for identifying the type of cargo, the equipment used for securement, and a checklist for ensuring that all securement measures are followed. Both documents are crucial for ensuring safety during transport, highlighting the importance of thorough inspections and proper procedures.
Lastly, the Accident Report Form can be compared to the Trailer Inspection form in terms of documenting incidents involving trailers. This form records details about an accident, including the parties involved, location, and damages. While the Trailer Inspection form focuses on pre-transport inspections, the Accident Report Form addresses post-incident assessments. Both documents serve to provide an official account of conditions and issues, helping to facilitate resolutions and improve safety protocols in the future.
When filling out the Trailer Inspection form, it is important to follow specific guidelines to ensure accuracy and clarity. Below are some recommended practices as well as common pitfalls to avoid.
Misconceptions about the Trailer Inspection form can lead to confusion and mistakes. Here are seven common misunderstandings:
Understanding these misconceptions can help ensure that the Trailer Inspection process is thorough and effective.
When filling out and using the Trailer Inspection form, keep these key takeaways in mind: