Homepage > Blank Concrete Checklist From Template
Article Guide

In the world of construction, attention to detail is crucial, especially during concrete pours. The Concrete Checklist Form serves as an essential tool to ensure that all critical aspects are covered before, during, and after the pouring process. This comprehensive form includes various sections covering preliminary checks, formwork and falsework, reinforcing steel, and more. By utilizing this checklist, supervisors can avoid overlooking important items that might lead to issues down the line. Each section is designed to jog the memories of on-site personnel, promoting thorough inspections. Notably, the form highlights mandatory Hold Points, Witness Points, and Tests, which require a supervisor's approval, ensuring no crucial steps are missed. Moreover, individual projects can benefit from tailored checks based on specific concerns, allowing less experienced supervisors to lean on the knowledge of their peers. By systematically documenting each phase of the concrete pour, the form not only streamlines onsite operations but also provides valid records for future reference. Additionally, it encourages documentation through photographs to enhance clarity on site conditions. This proactive approach to checklists can help minimize misunderstandings and disputes, ultimately leading to a smoother construction process.

Form Sample

project check lists concrete pour

use in conjunction with the specification for the subject project

INTRODUCTION

It is difficult during a visit to a construction site to memorise all of the details that need to be checked and while the obvious ones stand out, many other items that should be checked are forgotten. Supervisors may get distracted or over extended due to time constraints and overlook items that may have more serious consequences later in the project.

These Check Lists provide a guide to the inspections that are required on site for a particular project. They are a précis of the full clauses in the project specification and can be referred back to the specification if the full text of the particular item is required. The Check Lists will remind you of virtually every potential problem in materials, workmanship and coordination between trades.

The Check Lists include a list of the Hold Points, Witness Points and Tests that are required to be signed off by the Supervisor on projects that include the Project Control section. The rest of the checks are simply dot points to jog the memory of the Supervisor.

Project specific checks may be added to the Check Lists for individual projects and the experience of Supervisors can be shared by the addition of particular checks on items or operations that are generally of concern on site. In this case less experienced Supervisors can use these Check Lists to provide them with the back up of more experienced officers.

Provide one copy of the Check Lists book to the Supervisor and one copy to the Contractor for the particular project.

HOW TO USE THESE CHECK LISTS

Take photocopies of the relevant Check List sections before going on site and study these. This book of Check Lists is spiral bound to allow pages to be photocopied easily.

Mark any items in the Check List that are of particular concern.

At the project site, check off the work against the Check Lists and make notes of any action required in the space provided.

When the work is completed and the final check has been made sign off and date in the box provided. There is also space to provide comments.

Keep a record of all of the completed Check Lists for future reference if required. These could prove to be valuable if disputes arise on the project.

There is no better way to document actual site conditions or details than by photographs, so don’t forget to take a digital camera on site and take images to go with particular items in the Check lists.

FURTHER DEVELOPMENT

If you have any suggestions to improve on these Check Lists or the system in general please contact Lawrie Foscaro, Manager, Specification Services, 3rd Floor Highway House, Palmerston. Tel; 8946 5021 or email [email protected].

Doc ID

Version

Issued

Printed

Page

1.04–PCL CONCRETE POUR

2016.03

Sept 2016

19/09/2016

2 of 4

Comments from in-house staff, consultants or contractors are most welcome.

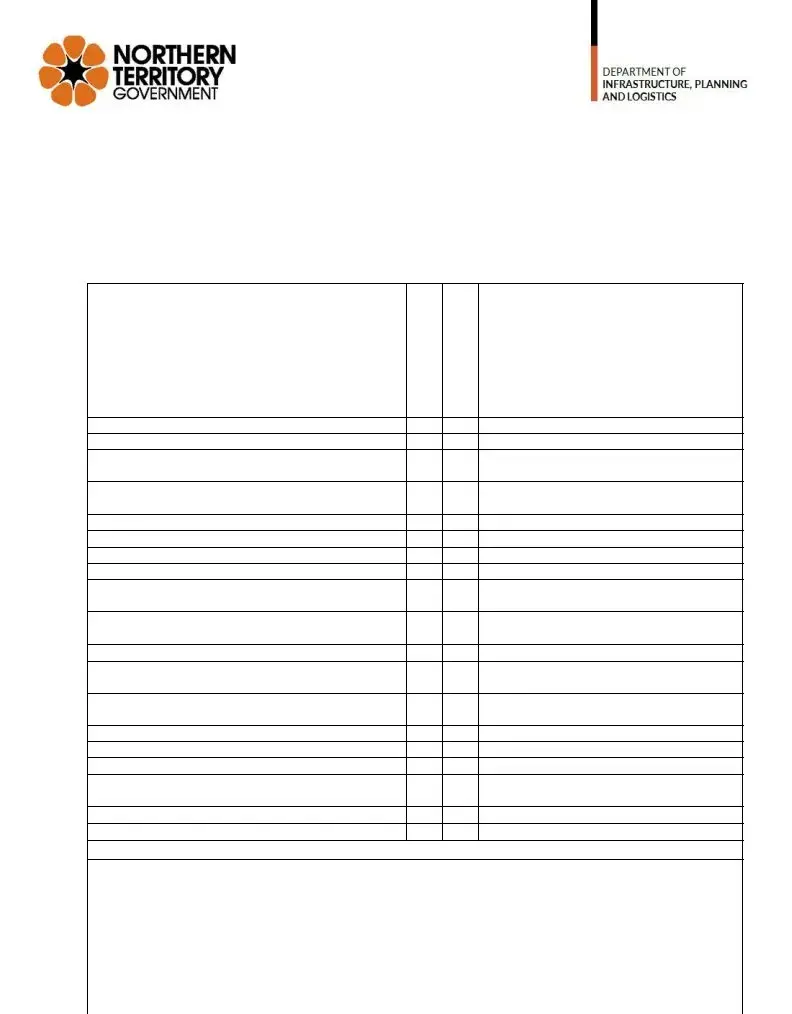
CONCRETE POUR CHECKLIST

Project/Job Name:

Contract No:

Audit Date:

Contractor:

Concrete Supplier:

Mix Design Approved/Not Approved


Audit Item

Y

N

Comments


1. Preliminary


Description


Lot Number/s


Previous Lots Conform


Casting Program Accepted


Curing Method


(Stream) (Water) (Fog) (Other)


2. Formwork and Falsework

• Formwork Dimensions in Accordance with Design, including void lengths

• Forms Clean, Smooth and Watertight and Free

of Deleterious/Extraneous/Foreign Materials

• Formwork within Dimension Tolerances

• Forms Meet Line and Level Requirements

3. Reinforcing Steel

• Steel Located/Fixed in Accordance with Drawings

• Reinforcing Clean and Free of Deleterious

Materials

• Critical Cover of 30mm Checked at all locations

• All Splices to Reinforcement at Approved Locations

• All Welds in Accordance with Australian Standards and RFT

4. Concrete Inclusions

• Embedded Dowels, Bolts, Conduits and Ducts

• Cored Holes, Weepholes, Block Outs, transverse stressing holes

• Lifting/Carrying Lugs etc

• Located as Shown on Drawings

Audit Results and Comments

Signature:


Date


Doc ID

Version


Issued

Printed

Page


1.04–PCL CONCRETE POUR

2016.03

Sept 2016

19/09/2016

3 of 4


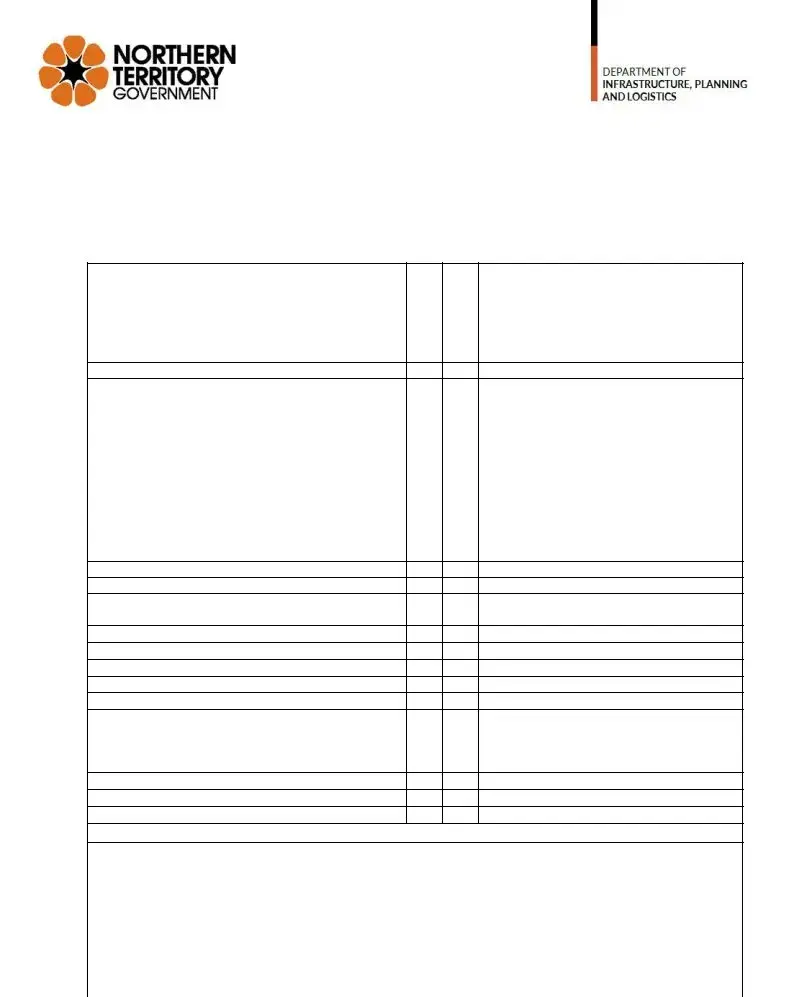
Audit Item

Y

N

Comments


5. Concrete Delivery


Number of Batches


• Batch Time (From Delivery Docket)


1.

2.

3.

• Arrival Time at Site


1.

2.

3.

Finish Time


1.

2.

3.


6. Concrete Testing


NATA Approved Testing Authority

Name:


• Ambient Temperature (Between 5oC and 35oC)


Actual Concrete Temperature

1.

2.

3.

Target Slump 50 mm ± 10mm. Actual Slump

1.


2.


3.


Amount of Admixture added

1.

2.

3.

Amount of water added

1.

2.

3.

• Number of Cylinders Taken


Target Strength


7. Concrete Placement

• Placement Method (Pump, Tremie, Chute,

Other)

• Sufficient Personnel for Finishing etc.

• Approved Vibration Method

• Back up Vibrators on Hand

• Reinforcement Cover Maintained During Pour

• Formwork Stable During Placing and Vibration

• Concrete Placed and Compacted Within: 25oC – 28oC = 75mins

28oC – 32oC = 60 mins 32oC – 35oC = 45 mins

• Provision for Closure of Access/Openings

• Forms Free of Foreign Matter Prior to Pouring

• Concrete Finished to Approved Tolerances

Audit Results and Comments

Signature:


Date


Doc ID

Version


Issued

Printed

Page


1.04–PCL CONCRETE POUR

2016.03

Sept 2016

19/09/2016

4 of 4


Document Specifications

Fact Name Description
Purpose of Checklist The Concrete Checklist serves as a guide for inspections required during a concrete pour, helping supervisors avoid omissions on site.
Need for Documentation Using the checklist leads to better documentation of actual site conditions, critical for resolving potential disputes later.
Hold Points The checklist includes Hold Points, Witness Points, and Tests that require documentation by the Supervisor for compliance.
Specific Checks Project-specific checks can be added, allowing supervisors to address unique concerns on site directly.
Record Keeping All completed checklists should be kept for future reference to assist in dispute resolution or audits.
Visual Records Photographic evidence is encouraged to accompany checklist items, providing a visual record of compliance and conditions.
Checklist Usage Supervisors should photocopy relevant sections of the checklist before visiting the site for effective use.
Signature Requirement Supervisors must sign off on completed work, date it, and provide comments as necessary.
Concrete Testing The checklist emphasizes the importance of concrete testing, including temperature and slump measurements.
Contact for Improvements Feedback on checklist improvements can be directed to the Manager of Specification Services to enhance the system.

Steps to Filling Out Concrete Checklist From

Completing the Concrete Checklist Form is essential to ensure that all necessary inspections and requirements are met during your concrete pouring process. Failure to follow these steps can result in serious issues down the line. Make sure you take your time and double-check your work for accuracy.

  1. Begin by filling in the Project/Job Name, Contract No, Audit Date, Contractor, and Concrete Supplier at the top of the form.
  2. Under the section for Preliminary checks, provide details such as Description, Lot Numbers, whether Previous Lots Conform, if the Casting Program is accepted, and the Curing Method.
  3. Next, check the Formwork and Falsework section. Ensure the dimensions match the design, and that it is clean, smooth, watertight, and free of foreign materials.
  4. Go through the Reinforcing Steel checks to confirm placement and cleanliness, checking for critical cover and approved weld locations.
  5. In the Concrete Inclusions section, verify the locations of embedded items as shown on the drawings.
  6. Now, move on to Concrete Delivery and list the number of batches including batch times and arrival and finish times.
  7. Confirm testing under the Concrete Testing section. Record the name of the NATA approved testing authority, temperatures, slump measurements, and admixture/water amounts added.
  8. Check the Concrete Placement requirements. Fill in details about the placement method, the number of personnel, backup vibrators, and stability of the formwork.
  9. Finally, sign and date the form at the bottom where indicated. Include any comments based on your observations during the audit.

By following these steps and meticulously filling out the form, you pave the way for a smoother concrete pouring process. Don't forget to keep a copy for your records as this could be invaluable in the event of future disputes.

More About Concrete Checklist From

What is the purpose of the Concrete Checklist Form?

The Concrete Checklist Form serves as a practical guide for supervisors to ensure that all necessary inspections are completed during a concrete pour. It helps prevent any critical steps from being overlooked, which can lead to issues later in the construction project. By following this checklist, supervisors can confirm the quality of materials and workmanship, as well as verify that all required coordination among trades is properly managed. The form streamlines the inspection process and captures vital details that can prevent future disputes.

How should the Concrete Checklist be utilized on-site?

Before heading to the project site, supervisors should make photocopies of relevant checklist sections to study. The spiral-bound format allows for easy photocopying, enabling supervisors to mark specific items that need additional attention. At the site, supervisors can check off completed tasks and record any necessary actions in the designated spaces. After the work is finalized, the checklist should be signed and dated, ensuring accountability and providing a clear record of what was inspected. Photographs taken during the process can complement the checklist entries, offering visual documentation of site conditions.

Can project-specific checks be added to the Concrete Checklist?

Yes, the Concrete Checklist is designed to be flexible. Supervisors have the option to include project-specific checks that address unique concerns pertinent to their site. This customization enhances its effectiveness and allows less experienced personnel to benefit from the insights of their more seasoned counterparts. Sharing best practices among supervisors through added checks can lead to a more thorough construction process and eliminate common pitfalls.

What should be done if there are suggestions for improving the Concrete Checklist?

If there are ideas or suggestions for improving the Concrete Checklist or its overall effectiveness, individuals are encouraged to reach out for feedback. Contact can be made via phone or email to the relevant manager, who welcomes comments from in-house staff, consultants, and contractors. Continuous improvement of these checklists ensures they remain relevant and useful for current and future projects, contributing to enhanced construction quality and efficiency.

Common mistakes

  1. Ignoring the Preliminary Section: Some individuals overlook the importance of checking the preliminary items, such as the description and lot numbers. This oversight can lead to confusion later in the project.

  2. Failing to Verify Formwork Quality: Ensuring that the formwork is clean, smooth, and watertight is crucial. Neglecting this can cause issues with the concrete pour, resulting in defects.

  3. Not Checking Reinforcement Placement: Reinforcing steel must be located and fixed according to the drawings. Failing to verify its correct placement can compromise the structural integrity.

  4. Skipping Concrete Delivery Details: It's important to note the number of batches and their respective arrival and finish times. Missing this data can complicate project scheduling and tracking.

  5. Overlooking Concrete Testing: Individuals sometimes fail to confirm that concrete tests are performed by an approved authority. This can impact the quality assurance process.

  6. Neglecting Temperature Conditions: Not monitoring both ambient and actual concrete temperatures can lead to issues with concrete setting and curing. Awareness of these factors is essential for a successful pour.

  7. Improper Concrete Placement Procedures: Some people might forget to follow the specified method for concrete placement. Incorrect methods can result in poor compaction and finish.

  8. Failing to Maintain Reinforcement Cover: During the pour, managing the reinforcement cover is critical. An inadequate cover can weaken the concrete structure.

  9. Skipping Documentation: Lastly, individuals often forget to document the checklist results and comments properly. Adequate documentation is vital for reference and resolving disputes in the future.

Documents used along the form

During a construction project, various forms and documents complement the Concrete Checklist Form to ensure smooth operations and compliance with specifications. Below are additional documents frequently used in conjunction with the checklist.

  • Formwork Inspection Form: This document verifies that the formwork meets design specifications before concrete placement. It includes checks on dimensions, cleanliness, and stability of the forms.
  • Concrete Delivery Ticket: This ticket provides necessary details on the concrete batch being delivered. Information such as batch number, time of delivery, and the supplier’s details are included, serving as proof of compliance with specifications.
  • Concrete Test Results Report: A record of tests carried out on concrete samples, this report includes data on workability, temperature, and compressive strength, ensuring that the concrete meets or exceeds required standards.
  • Site Safety Checklist: This checklist addresses safety protocols on the construction site. It verifies that all safety equipment is in place and that personnel are adhering to safety regulations to prevent accidents during the concrete pour.
  • Daily Log: This document captures daily activities on-site, including any issues encountered and resolutions. It helps in tracking progress and can be crucial for reference in case disputes arise.

Utilizing these forms alongside the Concrete Checklist Form enhances project oversight and ensures that all required standards are met. Proper documentation can also mitigate risks and facilitate smoother project execution.

Similar forms

The Concrete Pour Checklist Form shares similarities with a Safety Inspection Checklist. Both documents are designed to ensure a thorough review of critical aspects before proceeding with construction activities. The Safety Inspection Checklist outlines necessary safety measures and practices that must be followed on site, while the Concrete Pour Checklist focuses on the specific materials and methods used during concrete placement. Each checklist acts as a guide, encouraging the supervisor to check off items as they are completed, thus promoting diligence and reducing the risk of overlooking important elements that could impact overall project safety and quality.

Another document similar to the Concrete Pour Checklist is a Quality Control Checklist. Like the Concrete Pour Checklist, the Quality Control Checklist aims to ensure that all processes meet specific standards before moving forward. The Quality Control Checklist may cover various stages and aspects of construction, such as material quality, workmanship, and compliance with design specifications. Both checklists help rectify potential problems early by providing a structured approach to verify compliance, ensuring better outcomes for the project.

The Concrete Pour Checklist also resembles a Daily Log or Journal used on construction sites. This document typically details daily activities, materials used, and any incidents that occur during the workday. Similar to the Concrete Pour Checklist, the Daily Log serves to document details that may be referenced later, aiding in tracking progress and any deviations from the initial plan. Both forms ensure a comprehensive record of the construction process, which can be invaluable if disputes arise or if there is a need to trace back through previous decisions regarding the work.

Lastly, a Commissioning Checklist shows strong parallels to the Concrete Pour Checklist. A Commissioning Checklist typically outlines the essential steps and inspections required to ensure that systems and components have been properly installed and are ready for use. Both checklists focus on verification and validation of critical processes, driving project completion to meet established quality standards. Each checklist reinforces accountability and encourages the documentation of findings, thus providing a clear pathway to confirm successful execution of project phases.

Dos and Don'ts

When filling out the Concrete Checklist Form, it is crucial to follow certain steps to ensure clarity and accuracy. Here are four guidelines for what you should and shouldn’t do:

  • Do take photocopies of the relevant sections before your site visit.
  • Do check off each item thoroughly and make notes in the space provided.
  • Don’t skip any items, even if they seem trivial, as they can have significant impacts later.
  • Don’t forget to sign and date the form after completing your checks.

Misconceptions

Misconceptions about the Concrete Checklist Form can lead to confusion and oversight in construction projects. Here are eight common misconceptions, along with clarifications to help ensure a clearer understanding of this important tool.

  1. The checklist is optional. Many people assume that checklists are merely suggestions. However, they are essential for ensuring quality control and should be used on every project.
  2. All items on the checklist are equally important. While all items matter, certain items, such as those related to safety or key specifications, may carry more significant consequences if overlooked.
  3. The checklist covers every possible problem. Some believe that the checklist is exhaustive. In reality, it serves as a guide and can be supplemented with project-specific checks.
  4. The checklist can be filled out on-site without prior review. Many think they can simply go to the site and check items off. Instead, reviewing sections ahead of time can lead to a more thorough inspection.
  5. Once something is checked off, it cannot be questioned. Some may believe that a checked item is beyond scrutiny. Any checked item can and should be revisited if concerns arise later.
  6. The checklist is only for inexperienced supervisors. There’s a misconception that only less seasoned supervisors benefit from checklists. In fact, even experienced professionals use them as a valuable memory aid.
  7. The checklist is only about quality control. While quality is paramount, the checklist also addresses coordination among trades, safety requirements, and ensures compliance with specifications.
  8. Photographic documentation isn't necessary. Some might undervalue the importance of photos. However, visual documentation can be crucial for resolving potential disputes and verifying completed work.

Understanding these misconceptions helps highlight the true value of the Concrete Checklist Form. By using it effectively, teams can enhance their project management and ensure higher standards of quality.

Key takeaways

Utilizing the Concrete Checklist Form can significantly enhance the oversight of concrete pouring projects. Here are some key takeaways for effectively filling out and using this important resource:

  • Preparation is Crucial: Before visiting the construction site, make photocopies of the relevant checklist sections. Familiarize yourself with the content to ensure readiness.
  • Active Monitoring: As you progress through the concrete pour, actively check off items on the list. Take detailed notes in the margins for any concerns that arise during the inspection.
  • Documentation Matters: After completing the pour, sign and date the checklist. This provides a clear record of compliance and can be essential if disputes come up later.
  • Visual Evidence: Capture photographs of the site conditions and completed work. These images can substantiate your notes and clarify any issues that might need resolution down the line.